Saturday, June 16, 2012

Mold

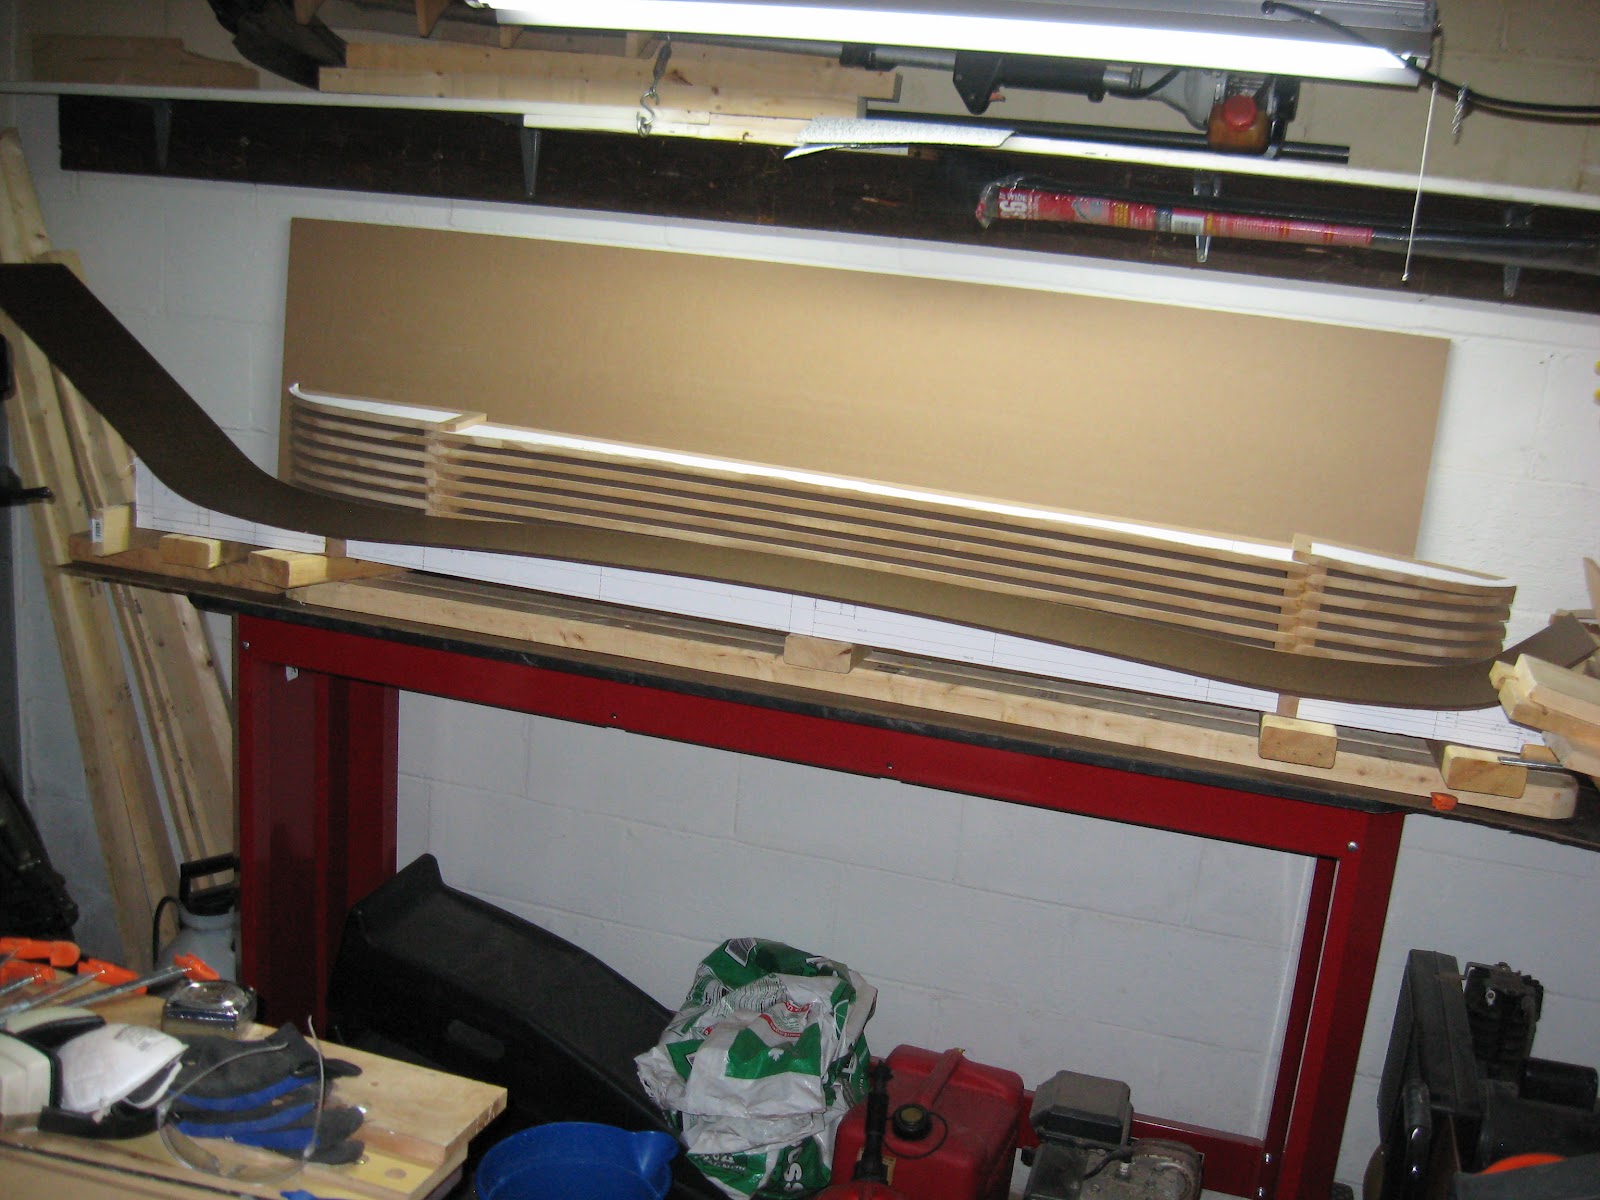
To create the ski mold this year I used a process similar to last year where I staggered 1/2 inch medium density fiberboard (MDF) and then glued two layers of 1/8" high density fiberboard (HDF) on top.  This year I decided to make the reverse mold at the same time as the ski mold.  I'm not sure why I didn't do this in the past, but I used the reject material from the mold to create the reverse mold.  Doing this allows one cut to create both halves of the mold.
 
To start the process, I pre-cut MDF rectangles for the tip, tail, and central portions of the mold.  The mold is 8.5" wide; therefore, nine (9) support members were cut for the tip and tail and eight (8) support members were cut for the central portion. Next, I took the template I printed earlier and cut it into tip, tail, and central pieces.  I then used spray glue to attach the templates to pre-cut MDF.

Once glued, the template was cut out with a jig saw.  This shape is then used to transfer the template to the other mold support members. Once all members arecut, I clamped like members together and sanded them as one to create a uniform surface.

When all members are sanded, they are glued and clamped together.  This is done for both the mold and reverse mold.


When the glue is dry, the entire mold is sanded again to ensure there is smooth transition between all pieces.  Once sanded and wiped down (to remove sawdust), the 2 sheets of HDF are glued to the mold.  The reverse mold is used to press the sheets onto the mold.  In order to protect the mold surface and provide even pressure, a blanket was placed between the halves before clamping.  The process is repeated for the reverse mold.


 When dry, the extra HDF material is cut from the ends of the mold and end caps are fashioned to reinforce the mold and provide a smooth surface for the air bladder to bear against.  Note, the reverse mold end cap was made prior to the application of the HDF to the surface.


The tail radius of curvature was a bit too small for the HDF and it cracked.  To fix this, I sanded the crack down and filled it with wood filler.  This created a smooth surface for the ski to be molded against.


The final step is place a scribe line at the center of the mold and then nail scrap edge material in place. To do this, the ski base was placed on the mold and the scrap edge material was nailed along side it. When the base is placed on the mold for pressing, the edges are used to center it and prevent it from moving forward or aft.
 
The mold and reverse mold are now ready for use.


Sunday, June 3, 2012

AMH-12 Core

As mentioned in my last post, I am making the cores for this years skis out of aspen, poplar, and oak. A core set of wood is shown below.


 Similar to years past, I am using what I call a pre-tensioned core design.  Rather than laminating thin strips of wood into a rectangle and then cutting the shape out of it, I cut two inner core members to a curve which allows for uniform wood strips in the center and on the sides of the core. Uniform strips on the ski edge  allow for even edge pressure.

The first step is to rip the core members to the predifined widths.  The three oak stiffeners are 5 mm wide.

Next, the shaped core members can be cut using the core member template.

Once this is done, the core members are sanded and can be glued together. A single core set is shown below consisting of 11 pieces.


This year I applied glue with a roller which improved the process over past years.


Once glued, a planer is used to create a smooth surface on both sides of the ski and to create the maximum thickness of 12 mm (binding platform).


The core template is then used to cut the shape of the tip and tail into the ski.  A jig saw works well for this.


The next step is to set up the ski profiling jig and cut the ski thickness profile with a router.


 Once profiling is complete the core is again sanded.  Once sanded, the core is complete and ready for layup.

Friday, April 27, 2012

AMH-12

RECAP

The skis I made last year seem to have done well.  My brother has spent time skiing the Panjshirs at Crystal Mountain in the state of Washington.  The Arlias have seen east and west coast skiing and have performed well.  A pair of the Arlias even survive falling from the roof of a car onto the pavement at high speed. ( http://mwallworkrn.blogspot.com/2012_02_01_archive.html ).


I continued to use my Goliaths in the backyard and took the tomahawks to the slopes.  To date none of the skis I have made have failed and only a single Goliath V1 edge has torn out (I have corrected this problem).

2012

This year I decided to make only a single pair of skis. I want these skis to be good for east coast skiing, where I live, but also have the ability to take on big mountain snow. Additionally, I wanted the ski to be relatively light to take on backcountry trips. I have temporarily named the ski the All-Mountain Holuta (AMH-12).

The ski dimensions are 127-88-109 and 186 cm long.  Additionally, the ski has tip and tail rocker, camber, and reverse side cut at the tip and tail. The rocker will allow for easier powder skiing while the camber will allow for good edge grip on hard-pack. The reverse side cut at the tip and tail shortens the turning radius of the ski from ~21m to 17.7 m.  This will allow for quicker turning despite the length of the ski.  The reverse side cut will also lighten the ski and allow for smoother maneuverability in deep snow.  The ski was lengthened over past years (186 vs 181 cm) since the rocker shortens the contact length of the ski.  Adding a few centimeters to the length re-lengthens the contact length.  The final design is below:


In order to make the skis light, I am using Aspen, Poplar and Oak in the core.  Several 5mm strips of oak spread through the core serve to provide ample stiffness to the ski while filling the gaps with aspen and poplar lightens the ski.  Oak is not frequently used in skis, and I'm not entirely sure why.  It is a little expensive but it is very hard and stiff.  Oak is also stronger than the majority of commercially available woods.  The hardness wears out tools more quickly which may be why it's not used commercially.  I am also planning to add two oak rails to the top of each ski; this rail will significantly improve stiffness and edge grip. A preview of the core is below:


I have also started making the templates.  Similar to last year, I have three templates: a base, rough core, and core member template; the use of these templates will be explained later.  To make the templates, I had the designs printed full size and then used spray glue to attach them to high density fiberboard that I purchased.


The templates are then cut out and are ready to shape the ski.

Sunday, December 25, 2011

Post Job Assessment

After I finished the skis I decided that some stiffness testing was in order.  The stiffness of a ski is critical to its performance.  A backcountry or powder ski needs to be lighter and can be softer.  The soft snow is more forgiving and high speeds are not typically achieved.  An east coast carving ski needs to be relatively stiff to hold an edge at high speeds and avoid vibration.  To test the ski stiffness I placed weights on the ski and measured the deflection.  After searching my house for weights I only found two 5 lb weights.  Since a gallon of water weighs approximately 8 lbs, I filled a bucket up with two gallons to get an additional 16 lbs.

I tested all the skis that I have to get a good comparison.  The goal with the skis this year was to design them so that they would be stiffer that the first generation Goliaths and softer than the second generation Goliaths and Tomahawks. This goal was achieved.  In order off stiffness, here is how my skis rank up from stiffest to softest.
  1. Tomahawk
  2. Arlia (M)
  3. Arlia (R)
  4. Panjshir
  5. Elan Silver Magic
  6. Blizzard Titan
  7. K2 Kung Fuja
  8. Goliath V1
The graph below shows the test results when 5, 10, and 26 lbs was applied to each ski.  Note that I tested the Arlia and Panjshir prior to attaching the second layer of fiberglass and topsheet; these results are noted by a (PC) after the name.


The calculations that I performed prior to building the skis are summarized in the table below.  These calculations did not take into account the stiffening properties of the epoxy.  The test results show that the epoxy has an average 4.18 stiffening factor for non-metal skis and around 2.4 for skis with metal built into the core.  The skis I built with metal rods in the core were very stiff and therefore the epoxy had less of an effect on the stiffness.  Since I don't have a pair of the second generation Goliaths I could not test the stiffness (these skis belong to my brother).
Overall the skis turned out as I expected and have a stiffness within the range that I had hoped for.  The following is a summary of what I have learned this season:
  1. Rather than packing tape, use contact paper to protect the base and top sheet as the application and removal would be easier.
  2. The cost of printing out full size templates is worth while.  In the past I printed out the templates on 8.5 x 11 paper and taped the sheets together.  This worked, but the skis were never quite straight.
  3. Assuming a mold springback of 15 mm is safe.  The Arlia mold was designed with a 30 mm camber and came out at 15 mm, as planned.
  4. Paper is a good medium for appling graphics (acrylic paint) and when soaked in epoxy becomes 70-90% transparent.  Cotton cloth still works well for opaque solid colors.  Solid colored construction paper may work well also.
  5. If a cap construction is used rather than a plastic sidewall, then the sides of the skis must be sealed to make sure the core is sealed after edge grinding.
  6. 120 grit sand paper / grinding wheel is appropriate for edge grinding.
  7. A course jig saw blade works best when trimming flashing off of the skis after pressing.
  8. Isospeed 4400 p-tex base material grinds more easily than Durasurf 4001 p-tex base material.  This is likely due to the Isospeed material being slightly harder than the Durasurf material.
  9. West Systems Epoxy, 150B Resin / 206B Slow hardener wets up easily and provides enough time for lay-up without hardening.  The pumps are worth buying to easily measure out the epoxy.
  10. Mounting edges on the ski mold effectively holds the base in place during pressing and simplifies the process.

Wednesday, December 21, 2011

Bindings, Grinding, Sharpening, and Wax

The final steps in the ski building process are to mount bindings, grind the base, sharpen the edges, and wax the skis.  I have done all of these steps in the past, but didn't have time to do them all myself this year.  I took the skis to Cycle Sport and Ski in Greensburg, PA and had the skis finished off there.  Using a professional grinding machine and expertise does have its benefits.

One additional step I needed to complete once the shop was done with them was to seal the edges of the skis.  In the process of finishing the skis, I ground the tip and tail round and ground the edges.  This process exposed some of the wood core.  In order to ensure that the core was safe from water I mixed up a little extra epoxy and went around the edges.

The ground and waxed base:

 The finished skis:


The bindings I used are shown below; note that none of these were bought at full price.  There is typically a significant discount for bindings from previous seasons.

Marker Free Ten Binding (MSRP $210)


Head Gold Thang Binding (MSRP $215)


Marker Baron Alpine Touring Binding (MSRP $445)


A final cost assessment shows that for three skis it took approximately $816 and 101 hrs of labor.  Per ski this is $272 and 34 hours of work.  Some of the final cost of the skis went into building the molds and templates; this would reduce the cost of the skis into the $240 range.  If I were to make $20 per hour working on this skis I would have to charge $920 per pair.  Ordering materials in bulk and automating machining processes would save additional costs.  Note that bindings, grinding, sharpening and waxing are not factored into this price.  A full cost and labor report is below:

For price and ski style comparison two Volkl skis are listed below.  I'm not saying that my skis are just as good as Volkl skis, but just comparing the price for a similar style ski:

Panjshir:  Gotama $825
Arlia:       Kenja $775

 Three generations of HOLUTA skis: